
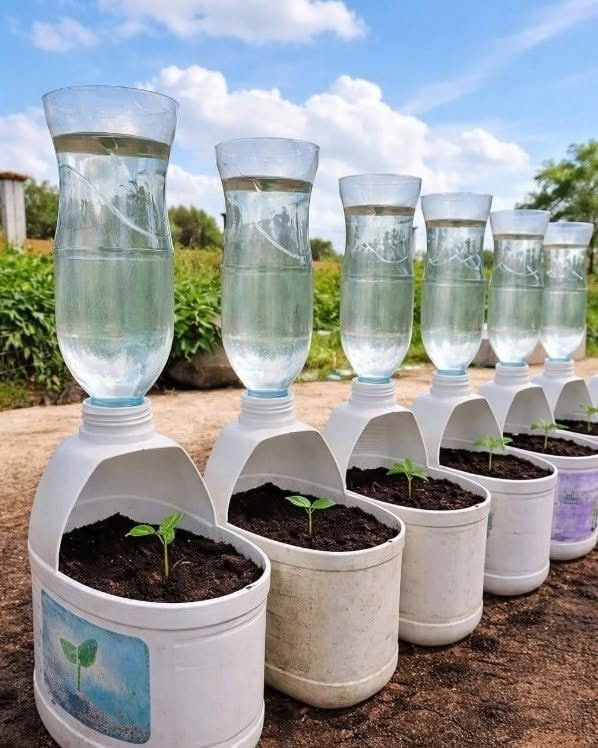
In an era of rising food prices, growing environmental awareness, and a widespread resurgence in home gardening, plant enthusiasts and homesteaders are constantly seeking innovative, low-cost ways to cultivate healthy crops. One of the most brilliant and accessible gardening trends gaining global popularity is the construction of DIY self-watering planter systems using upcycled plastic bottles and jugs.
By repurposing everyday household plastic containers—such as milk jugs, water bottles, and detergent containers—into self-regulating hydroponic or sub-irrigated planting stations, home gardeners can successfully sprout seeds, nurture delicate seedlings, and grow fresh herbs or vegetables with minimal effort. This clever system solves one of the most common challenges in plant care: maintaining consistent soil moisture without overwatering or underwatering. Here is a comprehensive step-by-step guide to building your own self-watering plastic bottle planters, the botanical science behind sub-irrigation, essential sustainability and health considerations, and practical gardening tips for maximum yield.
The Science of Sub-Irrigation and Capillary Action
To appreciate why inverted plastic bottle planters work so effectively, it helps to understand the physical principles of sub-irrigation and capillary action.
Traditional top-watering methods often lead to soil erosion, nutrient leaching, surface fungal growth, or root rot caused by stagnant water pooling at the base of pots. Sub-irrigated planter systems invert the watering process:
-
The Reservoir System: Water is held in an upper or lower reservoir vessel, separated from the primary potting soil mix.
-
Capillary Action: Soil particles and cotton wicking threads draw water upward against gravity into the root zone as the soil dries. This process is driven by cohesive and adhesive forces between water molecules and soil pores.
-
Atmospheric Pressure Regulation: In inverted bottle designs, gravity feeds water downward into the soil chamber until moisture levels equalize, preventing the soil from becoming waterlogged while maintaining steady hydration.
By supplying a continuous, self-regulated moisture feed, plants develop robust root systems, experience reduced drought stress, and grow significantly faster during early vegetative stages.
Step-by-Step Guide: Building Your DIY Self-Watering Planter
Creating a functional self-watering system from recycled household plastics requires basic hand tools and minimal preparation.
Materials and Tools Needed:
-
Large Plastic Jugs or Bottles: 1-gallon water jugs, milk containers, or large soda bottles (cleaned thoroughly).
-
Clear Plastic Bottles: Standard 1-liter or 2-liter clear plastic beverage bottles to act as upper water reservoirs.
-
Utility Knife or Heavy-Duty Scissors: For cutting plastic containers safely.
-
Cotton Wicking String or Fabric Strip: A strip of cotton cloth, microfiber strand, or thick cotton twine to convey water.
-
High-Quality Potting Mix: Lightweight, well-draining soil containing perlite, vermiculite, and organic compost.
-
Seeds or Seedlings: Vegetable seeds (such as tomatoes, peppers, lettuce, or herbs).
Construction Steps:
-
Prepare the Base Planter Chamber: Take a large, sturdy white plastic jug and carefully cut out a front opening using a utility knife, leaving the bottom tub intact to hold potting soil. Ensure the top neck opening of the jug remains intact.
-
Prepare the Water Reservoir Bottle: Cut the bottom off a clear plastic beverage bottle. Invert the bottle so the neck points downward, inserting it directly into the top neck opening of the lower jug planter.
-
Thread the Cotton Wick: Pass a 10-inch strip of wet cotton fabric through the narrow neck of the inverted clear bottle so it hangs down into the soil bed below while resting inside the reservoir above.
-
Fill with Potting Soil and Seeds: Fill the lower chamber with pre-moistened, lightweight potting soil and gently press your seeds or small seedlings into the center.
-
Fill the Water Reservoir: Pour fresh, filtered water into the top clear bottle reservoir. Gravity and capillary wick action will continuously hydrate the soil bed below, maintaining perfect moisture levels automatically.
Sustainability, Household Economics, and Financial Benefits
Upcycling plastic packaging into functional gardening gear offers significant economic and environmental advantages for modern households.
1. Reducing Household Food and Supply Expenditures
Building your own planters eliminates the need to purchase expensive commercial seed-starting trays, ceramic pots, or automatic irrigation equipment. Growing fresh vegetables and culinary herbs at home directly lowers weekly grocery bills, providing organic, nutrient-dense produce at a fraction of store costs.
2. Smart Financial Planning and Home Investment
Integrating sustainable living habits aligns with broader long-term financial management:
-
Optimizing Personal Finance: Diverting small routine expenditures toward self-reliance frees up monthly cash flow within household finance budgets.
-
Long-Term Asset Building: Reallocating household savings into high-yield accounts, home mortgage equity payments, or diversified investment portfolios strengthens financial security leading into retirement.
-
Educational Value: Teaching children how to repurpose materials and cultivate food provides lifelong education in resourcefulness, environmental science, and practical agriculture.
Health, Safety, and Legal Protections in Food Gardening
While upcycling plastic bottles is an eco-friendly practice, selecting safe food-grade materials and protecting your family’s health is essential when growing edible crops.
1. Choosing Safe, Food-Grade Plastics
When selecting plastic containers for vegetable cultivation, always check the resin identification code stamped on the bottom of the bottle:
-
Safe Plastics for Edibles: Look for plastics labeled #2 (HDPE), #4 (LDPE), and #5 (PP). High-Density Polyethylene (#2) is commonly used for milk jugs and water containers, making it an ideal, non-leaching choice for growing food.
-
Plastics to Avoid: Avoid using plastics labeled #3 (PVC), #6 (PS), or unidentified plastics, as these can leach harmful phthalates or chemical compounds into soil when exposed to heat and sunlight.
2. Healthcare and Insurance Considerations
Maintaining physical health while engaging in outdoor gardening involves practical precautions:
-
Navigating Health Insurance: Comprehensive health and primary medical insurance policies cover routine tetanus boosters, skin screenings, and physical therapy consultations should gardening strains or accidental cuts occur.
-
Securing Life Insurance Protection: Establishing comprehensive family protections—including life insurance coverage and consultation with reputable legal services or an estate attorney—guarantees long-term security for your family.
Fascinating Facts About Upcycled Gardening and Plant Care
-
Global Plastic Waste: Over 380 million tons of plastic are produced globally each year. Upcycling single-use containers extends their functional lifespan and reduces immediate landfill accumulation.
-
Preventing Root Rot: Overwatering is the number one cause of indoor plant mortality. Self-watering sub-irrigation systems prevent oxygen deprivation in roots by delivering water only as the plant transpires.
-
Micro-Microclimates: Clear plastic upper bottles can also double as mini-greenhouse domes (cloches) during cold early spring days, trapping ambient heat and humidity to accelerate seed germination.
-
Urban Homesteading Growth: Studies show that home vegetable gardens yield an average of $600 worth of fresh organic produce per year from just a modest 100-square-foot growing space.
Practical Tips for Successful Self-Watering Planters
To ensure your upcycled plastic bottle planters yield strong, thriving crops, follow these practical maintenance tips:
-
Place in Adequate Sunlight: Position your planter row in a location that receives 6 to 8 hours of direct sunlight daily, such as a south-facing patio, balcony, or windowsill.
-
Use Lightweight Potting Mix: Never use heavy topsoil or dense garden clay in self-watering containers. Heavy soils compact quickly, preventing proper capillary water movement and smothering plant roots.
-
Monitor Reservoir Levels: Check clear top reservoirs weekly and top them off with fresh water before they empty completely.
-
Add Soluble Organic Fertilizer: Mix a mild, liquid organic fertilizer (such as kelp meal or fish emulsion) directly into the water reservoir to provide continuous, balanced nutrition during active growth phases.
-
Drill Overflow Drainage Holes: Drill a small drainage hole in the lower soil container just above the water line to allow excess rainwater to escape during heavy storms.
Final Thoughts
Transforming discarded plastic bottles into efficient self-watering planters is a rewarding, eco-friendly project that combines practical recycling with sustainable home food production. By harnessing capillary action and sub-irrigation, these clever planters make growing fresh herbs, flowers, and vegetables easy, reliable, and affordable for gardeners of all skill levels. Start saving your plastic jugs today and enjoy the rich rewards of a thriving home garden!
Frequently Asked Questions (FAQ)
Are plastic water bottles safe to use for growing edible plants?
Yes, provided you use food-grade plastics. Look for plastics marked with recycling codes #2 (HDPE), #4 (LDPE), or #5 (PP), which do not leach harmful chemicals into soil or food crops.
How does a self-watering plastic bottle planter work?
The system utilizes capillary action. Soil and a fabric wick draw water upward from a reservoir as the soil dries, providing steady, self-regulated moisture directly to plant roots without overwatering.
What crops grow best in small self-watering bottle planters?
Small to medium self-watering planters are ideal for starting seeds, propagating cuttings, and growing small leafy greens (like lettuce, spinach, and kale), bush beans, radishes, and culinary herbs (such as basil, parsley, mint, and cilantro).
How often do you need to refill the water reservoir?
Depending on ambient outdoor temperatures, sun exposure, and plant size, clear top reservoirs typically require refilling once every 5 to 10 days, making them perfect for busy gardeners or short travel trips.
